
USB drives are devices that most people have these days. It is rare to find a person with one drive. They prefer to have two or more drives. Their main purpose is to help in the storage of information or help the users to transfer data. However, how do you remove write protection from the USB drive in windows 10?
Several errors arise during the use of the drives. One of them is the error during formatting, and the other is the error that comes when you are trying to put files on the USB drive.
These are problems that make some users give up because they don’t know the solution and think that the drives are spoilt. However, write protection is the thing that makes the drives unusable until you remove them.
What is write protection?
Write protection is a form of security that devices come with. Such devices may include USB drives and hard disks, SD cards, and other storage devices.
The main role that USB drives play is to protect the information you have stored in the devices from loss. It will also not allow other users to keep any other information in the drives. It is a good measure, but users who have no clue about the right protection will experience extreme challenges.
Further reading: What is a Capture Card for Streaming | How do I use a PCIe or USB Interface Capture Card?
When a device has to write protection, you can only read the contents, but you cannot add or remove them. Our article today is helpful as it will show the USB drive users how to remove the right protection from the devices. We will also learn a few more things concerning these devices.
Causes of write protection
It is a common thing to have people write protecting their USB drives. The major reason is to ensure that you have no one doing anything with the contents of the USB drive. However, there are other reasons that you can find the USB drive and other storage devices with write protection.
Some of these reasons include
- Locking the physical switch– Some flash drives have physical switches that can lock at any time. In most instances, the locking takes place accidentally.
- Mistake– the write protection mode comes by mistake sometimes. You can buy a device that has write protection, making it not easy to use. You can also make a mistake and find the write protection feature active.
- Third-party settings– third party settings and devices are other features that can make the write protection feature go off. These can be things such as software, virus, and other things. They make the disk unusable until corrected.
- USB volume– USB volume is a feature that is very good at enabling the BitLocker feature. It makes it active and the device unusable once more.
We have several ways that will help us to remove the write protection from the devices. If you have a computer that uses Windows 10, we are here to help you. Windows 10 is one of the complicated ones as it makes the operations slightly confusing.
Additional reading: Best Notebook for Students-7 Best College Laptops
If you have other models such as windows 11, 7, or 8, you will have an easy time removing the write protection. However, our methods are nice as they will help you create a solution using computers that use Windows software.
How to remove write protection from a USB drive using windows 10
Physical lock switch
One thing that most people forget is that there is a physical switch in the USB drive. You will commonly find the switch in the sides of the drive, and once you push it, you either enable or disable the write protection. If the button is pushed, it makes the USB drive unusable to both computers and USB devices.
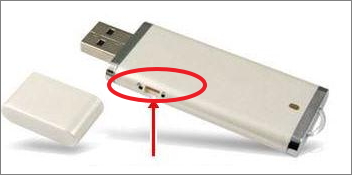
When using the physical lock switch, you can remove write protection from the USB drive without deploying windows 10 or any other OS. Removing the write protection using the switch will need you to do the following.
- Locate the switch
You have first to locate the switch before taking the steps. The switches come on various designs that either simplify the use of the drives or make them more complicated. Once you get it, push it on the opposite side so that it is off.
- Connect the drive to the computer
The next thing is to connect the drive to the computer. A message appears on the computer that there is a device that you can access through it. You have to check if the write protection has disappeared from the computer. If it appears, then you will proceed to make the other changes.
- Set the device
After observing that the write protection is off, you can now have the disk in a good state; you will scan it to ensure that there are no viruses and malware. After scanning, you will remove the contents in it and back them up to the computer. Now you can format so that you start storing the contents afresh.
Formatting means that you will lose all the information that the cards possess.
Using the Diskpart command
Another proven way to remove the write protection off the USB drive is by using the Diskpart command on Windows 10 and other OS. This is a command that you will find in windows 10 and will remove the read-only attribute of your USB drive. After its removal, it makes the USB drive usable once more.
Additional reading: How to Enable 5GHz Wi-Fi on Laptop (Windows 10 and other versions)
The good thing about this command is that it applies to both USB drives and SD cards. It is possible to use it on other external storage devices that have the read-only attribute. Let’s see how to locate and use the feature to solve the problems in the USB drives.

- Press the Windows button and the R button simultaneously on your computer. After pressing the buttons, you will type cmd, and it will immediately launch the feature on the computer.
- Type the word diskpart on the command prompt that is appearing on your screen. After typing, you will press enter, and the functionality will begin to work.
- Now type the word list disk, then press enter. This is a command that allows you to see the devices operating on the computer and access them.
- Select the disk you want to work on. In most cases, you will have to type select disk 2 and press the enter key if you cannot see the disk. For easy recognition, you can press 0 to replace the disk’s name that is appearing on the computer.
- Key in words attributes clear disk read-only, then press the enter key. This feature will remove the read-only command and presence in the disk and give room for more use.
- Observe the functionality of the USB drive and see how it continues to work. If it is okay, you will type the word exit to finish up and quit the diskpart command.
- It is always good to restart the computer or PC immediately after working on the USB disk. After restarting, you will insert the disk again to see how it continues to function.
- Now remove the contents in the USB drive and back them up on the storage of the computer. Once you finish, you will format the USB drive and then restore the contents.
Use of third-party tools
Some people will opt to try third-party tools to remove the write protection on the computers, especially on Windows 10 for their USB drive. Some will also use them because the first two methods are a little bit complicated to use. The graphical solutions are easy to use because they do not need frequent commands to function as you desire.
Further reading: Best Laptops Under £600 in the UK
Various third-party software help you to do the task. One that has very good recommendations for these tasks is the EaseUS CleanGenius. It is a nice option because it fixes the problem without knowing the process of the commands and how they work.
- Download the software
The initial step involves downloading the third-party software you intend to use. The best one can be the EaseUS CleanGenius which you will browse on the computer and download for free. You can also get it here.
- Install and run the program
You have to install the program and run it after downloading it. It is very simple. You will right-click and then pick the run option, which now activates it in readiness for use.
- Optimize the software
Before you get to actual working, you will optimize the software to serve the ideal purpose you desire to have. During the optimization, you will ensure that you have picked the right protection mode. Immediately you click the optimization feature, the system analyzes the device’s functionality and gets all the areas that need a solution.
- Disable write protection
Now you have to click the device you want to work on and disable the write protection feature. It will make it accessible and ready for use.
The registry editor
Another way to remove the write protection is the use of the registry editor for your USB drive on Windows 10. It fixes the USB drive and many other devices without much struggle. The process is a little bit advanced and can serve USB and SSD, HDD, and SD cards. It needs proper understanding before you get to the actual use.
Any wrong procedure using this method will cause more problems to the outcome. It may damage the device and expose your computer to several corrective procedures. Caution is necessary for this process.
- Connect the disk to the computer
If the USB drive has manual write protection, you will remove it first and ignore this process. However, you will begin by connecting the device to the computer and then ensuring that it can detect it.
- Open the registry editor
The next thing you will open is the registry editor. You will press WINDOWS+R keys. Immediately a pop-up will appear with a space that allows you to key in information. Type Regedit in the space that appears and then immediately press the enter key.
- Locate the HKEY_LOCAL_MACHINE
This is an option that expands the system so that you have more options. It will allow you to make the changes that will make the functionality of the USB drive better.
- Remove the write protection
You will now remove the write protection by locating the current control set. Once you get it, you will click on the control key. You will immediately have the write protection setting off your device.
- Check on the storage device
Now you have to assess the storage device policies. It has to make the necessary changes after you change the DWORD value to 0 and then complete by pressing okay. Once you complete, you will exit the registry editor and restart the device to be accessible for the extended functions once more.
Turning off the BitLocker
Another famous method of removing the write protection is turning off the BitLocker. The BitLocker is a feature that blocks the functionality of devices such as USB drives. When active, you can only see what is in the USB drive and cannot do anything.
Additional reading: Best Capture Card for Nintendo Switch- 2021 Top 5 Cards
Removing write protection means that you have to disable this feature. Bitlocker is like partitions that you have to remove from the computer. Below is how you will do the process.
- Open the file explorer
The initial step requires you to open the file explorer. After opening the file explorer, you will right-click the Bitlocker partition and pick the manage Bitlocker option.
- Select the locked device
Selecting this device means that you have the authority to make various changes to it. You will pick the option of switching off the Bitlocker. It makes the device ready for use immediately.
- Give the BitLocker room for self-decryption
Now you have to give the Bitlocker room to do self-decryption. It is essential as it works slowly to remove the write protection from your device immediately. This is a process that takes place without having you implement any other commands. From this stage, you can now manage the data that is in the USB drive.
Conclusion
If you have a windows 10 computer, you don’t need to complain about how to remove write protection on a USB drive or any other device. Our guide is effective and comprehensive as it will help you remove write protection from your storage devices. You can choose any of our methods as they are all comprehensive.
Removing Write Protect on USB Drives FAQs
Can I remove write protect on a USB drive in Windows 10?
Yes, you can remove write protect on a USB drive in Windows 10 using any of the 5 effective methods: 1) Using the Physical Lock Switch, 2) Run Diskpart Command, 3) Run Write Protection Remover, 4) Using Edit Registry, or 5) Turning off BitLocker Partition.
Why can’t I remove the write protection USB?
It depends on whether the write protection has been done mechanically or on the software. If it is mechanical, you need to trace the physical lock switch and turn it on. However, you may need to either use the software write protection remover in other instances.
How can I remove write protection from my SanDisk pen drive?
You can remove write protection from your SanDisk pen drive using the following methods: 1) Run Diskpart Command, 2) Run Write Protection Remover, 3) Using Edit Registry, or 4) Turning off BitLocker Partition. The choice of method depends on the software available and your expertise
Why is my USB write protected?
Write protection is a data protection mechanism that makes modifying or erasing data on a device complex. Therefore, the feature ensures that you do not accidentally or purposefully delete or modify data on your device since it is on read-only mode.
18 thoughts on “How to Remove Write Protection from USB Drive in Windows 10- 5 effective ways”
Comments are closed.